While I love the stitching part of making the stockings, it is always a little terrifying to actually sew them together. And since often on one of the discussion boards on Ravelry people ask about how to sew stockings together, for my future reference and yours, here is a tutorial on how to sew a needle-pointed or cross stitch Christmas stocking.
First your supplies: beside your complete top, you will need a cotton fabric for the lining and a fleece or flannel for the backing. For most of the stockings I have made I have purchased 1/3 of a yard for each stocking's lining and 1/3 of a yard for the backing (though I can normally get 2-3 backings out of one piece). All the fabric, including the completed tops should be ironed. You also need coordinating thread, straight pins, a fabric pencil, ruler and a sewing machine. A rotary cutter and cutting mat are helpful, but not necessary.
 |
| Fabric all gathered |
Step 1: Cut your completed stitched piece. The Scariest! Cut your competed top! (Take a deep breath first, and it will be okay). I like to have the edge of the pattern be the edge of the stocking, other people want a board of plain fabric - decide what you want. If you sew on the edge of the pattern cut about a 1/4 to 1/2 board around the pattern. If you want a boarder, plan accordingly.
 |
| Apparently I can't cut and take non-blurry pictures at the same time. |
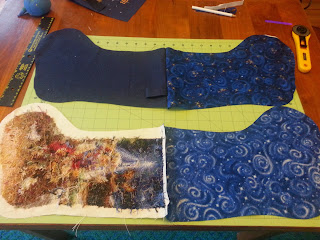
Step 2: Cut the rest of your fabric. Use your top as a stencil to cut your lining and your backing. You want two pieces of your lining one with the toe facing the same way as the stocking, one the reverse. And if there is a right side to your backing fabric, you want the toe to face the opposite direction of your top. I normally cut both linings together by folding the fabric over.
So your pieces should look like this when laid out in a line.
 |
| Facing up: Correct side, reverse side, correct side, reverse side |
Step 3: Get your hanger ready. If I forget a step, this is that step. You can use ribbon, yarn, corded thread, or fabric. Personally I use a piece of that backing fabric, cut to be 1 inch wide and 5-6 inches long. If using fleece you want to sew around the edge of the fabric to keep from fraying.
 |
| Almost forgot to take a picture of the hanger. |
Step 4: Pin and sew the tops. You want to lay your top with the reserve facing lining correct sides facing each other and pin the tops together. Then do the same for the backing and the other lining piece. So they look like this.
 |
| Wrong sides together |
Before sewing, peel back the corner of the backing piece on the heel side and add your hanger. It should be placed about 1 inch from the edge and face toward the toe.
 |
| A little tab |
Now you can sew those two straight lines.
After sewing, you can trim the excess fabric and your pieces should look like this:
 |
| Starting to come together. |
 |
| Soon and Very Soon |
Step 5: Pin and sew the stocking Lay your stocking out so the top and the backing are aligned and so do your linings, correct sides facing each other.
 |
| Before |
 |
| After |
Pin the pieces together around the edge of your stocking
Sew, leaving about a 4 inch gap between the heal and toe of the lining.
Step 6: Trim and Flip Trip off the excess fabric leaving just a small edging near the sewn seam.
 |
| Almost there |
Then bring the right side out, by pushing the sock through the 4 inch hole you left in the lining.
 |
| Should I just leave it like this? |
Step 7: Hand sew Sew up the 4 inch hole and then push the lining into the stocking
 |
| What type of creature wears a sock like that? |
 |
| Feed Me! |
 |
| Beautiful! |
Step 8: Hang and Enjoy!
 |
| No mantle here - Bookshelves will have to do. |


No comments:
Post a Comment